A lot of people these days have started expressing an interest in growing and preserving their own food. This diary will cover some of the basic techniques involved in canning fruits and vegetables.
Home canning can seem intimidating to a person who has never done it before--but it really isn't all that hard once you learn a few basic principals. Mostly, it's just hard, sweaty work--but well worth it, since the product you will end up with will be far superior to anything you could buy out of the grocery store!
Let's roll up our sleeves and get started.
First of all, there are two basic methods of home canning--the boiling water bath method and pressure canning. The method you use depends upon the acidity of the food you are canning--in order to be absolutely safe, you want to make sure you are processing the food correctly in order to be certain you have killed all the microorganisms that could cause your food to spoil--especially Clostridium botulinum, which can lead to a serious, even fatal case of food poisoning. It is easier to kill this nasty bug in high acid foods--those with a pH of 4.6 or less, such as tomatoes, fruits, or pickled foods--making the boiling water method a safe means of processing them. Low acid foods, such as vegetables or meats, can only be safely canned using a pressure canner. Cleanliness and strict adherence to the rules regarding proper processing times are crucial to your success.
Boiling Water Bath Method
In this method, the canning jars are placed in a water bath canner, which is essentially a large cooking pot that has a tight fitting lid with a rack in the bottom. The rack keeps the jars from touching each other and allows boiling water to flow around the jars. The packed jars are placed in the rack and lowered into enough boiling water (212 F at sea level) to completely cover them by a couple of inches.
If you are strapped for cash, any large kettle with a lid that is deep enough to cover the jars with 2 inches of water and a diameter no more than 4 inches wider than the burner on your stove can be used as a canner. Just make sure you improvise some sort of rack to go in it--allowing the jars to touch the bottom of the kettle will cause them to break.
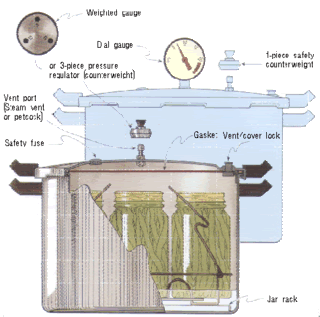
Pressure Canning
A pressure canner must be used to process low acid foods--no exceptions. The only way to kill Clostridium botulinum in these foods is to heat the food to 240 F, which can only be done at home by creating steam under pressure.
Older pressure canners usually had a 'dial-type" pressure gauge and a petcock for allowing steam to escape. Newer canners often have a weighted gauge that jiggles once it has reached the proper pressure.
Here's a handy-dandy picture I found online illustrating the parts of a pressure canner:
The basic steps used in pressure canning are as follows:
First, put about 3 inches of water in the bottom of the canner. Place your packed jars on the rack and place them in the canner. Fasten the lid and start heating it over high heat without the weight on (or open the petcock). Keep heating it until steam starts to come out of it, then let it keep exhausting the steam for 10 minutes.
Next,put the weight on the vent port or close the petcock. Within a few minutes the dial gauge on the canner will show that it has reached the proper pressure, or if your canner has a weighted gauge, it will start to jiggle--and then start timing it.
During this time, you will want to keep an eye on it to insure that the pressure level is at or a little above the recommended pressure. If it dips below the proper level, you will have to jack up the heat and start timing all over again once you get it back up to pressure.
Once your food is done, remove the canner from the heat and let the pressure gradually return to "0" on the pressure dial or allow the weighted guage to completely stop jiggling. Then, remove the weight or open the petcock and let it sit for 5 minutes or so before carefully opening the lid and using a jar lifter to remove the jars. Put them on a towel and allow them to cool--it's a good idea to cover them with another towel to keep drafts away.
Adjustments to the processing times and pressure level must be made if you are more than 1000 feet above sea level. Consult your pressure canner's documentation.
Some Notes On Equipment
It is important to have a good quality canner--especially your pressure canner. A cheaply made pressure canner is one you will constantly have to buy replacement parts for. A good pressure canner will last damn near forever as long as you take good care of it.
From time to time, you will need to replace the gasket--do this when you notice that it has little cracks or chips, or if it starts feeling gummy. Some high end canners are so precisely made they don't even need a gasket--if you plan on doing a lot of canning, spend the extra cash and get one of these. If you buy a used one, check closely to make sure all the parts are there.
Canning jars will be your biggest investment. You want to use "ball" or "mason" jars made specifically for canning, not the jars food from the grocery store comes in. The lids probably won't fit and they might not stand up to the rigors of home canning. Canning jars can be used indefinitely. Go around to yard sales, thrift stores and estate sales to find super cheap deals on them. As long as a jar has no cracks and the mouth of the jar isn't chipped, it's usable. If they have a film on them, soak them in some water and vinegar overnight.
You'll need to pick up lids and rings. The lids can only be used once--the rings can be reused as long as they are not bent or starting to rust.
In addition, a jar lifter is handy to have, since it will keep you from getting burned. A kitchen funnel is handy for neatly packing the jars. You will need a set of metal tongs or a gadget called a lid wand to fish your lids and rings out of the boiling water you will use to sterilize them. You'll want to have plenty of clean kitchen towels handy for wiping up spills and cleaning the rims of the jars. A knife or rubber spatula is handy for getting the air pockets out of the jars.
You will also need extra kettles for sterilizing jars and lids, and pre-cooking some foods.
Packing The Jars
First of all, you're going to want to set up your work area. If you have a small kitchen, you will want to clear all the junk out of the way--I temporarily move the coffee pot, microwave, and toaster to another location so I can give myself plenty of elbow room. Use some sanitizer to clean all the surfaces in your work area before you begin. It's a good idea to have some clean towels handy to set the hot jars on to keep from scorching your table or counter.
Next, wash all your jars and inspect them to make sure they are not cracked or chipped. Put the jars, lids, and rings in a big kettle, the cover them with water and start boiling to sterilize them. Boil them for at least 10 minutes before you start packing them. If you are at an elevation higher than 1000 feet above sea level, add one minute for each additional 1000 feet.
Start prepping your food, according to the recipe for whatever it is you will be canning. Cut out or discard any pieces that are over-ripe. Make sure all fresh produce is thoroughly washed--it's much harder to kill the germs present in grains of dirt.
There are two basic methods of packing food--hot pack and cold pack. Hot packed foods are pre-cooked before being placed in the jar, while cold pack foods are generally put in the jars raw. The recipe you are using will tell you which method to use.
In addition, pay close attention to the amount of head space your recipe calls for. The food will boil, and therefore, the volume in the jar will expand somewhat during processing. If you put too much in the jar, it could boil over and get underneath the lid, meaning you won't get a good seal and the food could spoil. In addition,after packing each jar, wipe off the rim to remove any food that may have spilled on it.
Let's Can Some Tomatoes
We'll use the boiling water bath method for these. Prepare your work area and wash your jars, as outlined above.
To make 7 quarts of tomatoes, you will need about 21 pounds of tomatoes. Dip the tomatoes in boiling water for about 30 seconds, or until the skins start to split. Immediately pull them out and put them down in a big bowl of ice water. The skins should slip off easily. Cut the cores out and quarter them up.
Start boiling the water in your canner.
In a large kettle, start boiling your jars, lids, and rings. Meanwhile, place the tomatoes in a large kettle and add enough water to just cover them. Bring them to a boil and let them cook for about 5 minutes.
This is the part when you have to work quickly. Pull a jar out of the boiling water. Fill it with enough tomatoes and cooking liquid to leave you with 1/2 inch of head space. A pitcher or large cup with a handle and a wide mouthed funnel are good for this. Add salt, if desired. Quickly wipe the rim of the jar, and pull out a lid and a ring. Seal the jar. Place it in the canning rack. Repeat this process until you either run out of tomatoes or jars.
Lower the filled canning rack into the canner. There must be enough water in it to cover the top of the jars by at least 2 inches. If need be, add some of the water from the kettle you used to sterilize the jars in order to make enough. Put the lid on the canner.
Bring the canner to a hard boil, and start timing. Let the tomatoes cook for 50 minutes. Remove the jars from the canner and place them on a towel to cool, protecting them from drafts. Wait at least 12 hours before checking the seal. You should hear the jars pop as they are cooling. Press your finger on the lid--it should not move and should have a concave shape.
It is important to note that some varieties of tomatoes or other fruits may not contain enough acid to safely process using the boiling water bath method. The fix for this is to add some lemon juice. According to the USDA, the following varieties of tomatoes are low acid--Ace, Ace 55VF, Beefmaster Hybrid, Big Early Hybrid, Big Girl, Big Set, Burpee VF Hybrid, Cal Ace, Delicious, Fireball, Garden State, Royal Chico, and San Marzano. This list is not all inclusive--if you're not sure, it's better to err on the side of caution and add some lemon juice. Use 2 tablespoons per quart jar, adding it before you fill it with tomatoes.
Canning Green Beans
This will be much easier than canning tomatoes. To make 4 quarts, you will need:
About 2-1/2 to 3 pounds fresh green beans
Salt, if desired
A kettle of boiling water
Prepare your jars, as outlined above. Remove the strings and ends from the beans, and break them up. Wash them thoroughly. Pack the beans into the jars leaving 1 inch of head space. Add the salt and cover with boiling water--make sure you still have 1 inch of head space. Use a knife or rubber spatula to insure you have removed all the air pockets. Wipe the rims and seal up the jars. Process them at 10 pounds pressure for 25 minutes, using the basic pressure canning instructions above.
Cool, just as you would for tomatoes, and check the seals after at least 12 hours.
Due to the amount of information I have to share about canning, I had to split this diary up into several parts. Next Sunday, I will go into detail about canning fruits and making jams and jellies. The following week, I'll do a piece on pickling. Another diary will cover the ins and outs of canning meat. Then finally, I'll do a diary that deals with canning vegetables--and I'll share my recipes for stuff like salsa and home-made V-8 juice.
